
Your input library is where you can create and manage templates for bases, assets, and logistics, and add custom weather data.
Anything you add to your input library, or that other users have shared with you from their input libraries, is available for use in simulation cases you create.
Add bases
Creating input library templates saves time: add ports and offshore bases to your input library so they are available to add to any case you create. Parameters set at the input library level are carried over to the case level. Leave blank any parameters that will vary on a case-by-case basis: you can complete these at the case level.
- Click on Input Library in the top bar.
- By default, you land in the Port library. You can switch to Offshore base using the toggle in the top left.
- Click the + Add button on the left-hand side.
- Complete the required parameters.
- Offshore base:
- Only requires a title. Further parameters are set at the case level when you add the base to a case from your input library.
- Port:
- The port parameters table provides information on the required and optional parameters.
- Offshore base:
Base inputs
After you add a base to the input library, you can click on it to see the parameters listed in the table below.
Parameters
| Parameter | Required | Description |
|---|---|---|
| Latitude Longitude | x | Base location coordinates. Choose Pick location on map to manually mark the location and automatically generate the coordinates. |
| Number of repair slots | Number of slots available for repairing assets that are towed to the base for repair. | |
| Loadout berth capacity | For components arriving into port. Number of components that can loadout simultaneously into the port. If you don't specify a number, the capacity is unlimited. |
|
| Loadoff berth capacity | For components leaving port. Number of components that can loadoff simultaneously from the port. If you don’t specify a number, the capacity is unlimited. |
|
| Total berth capacity | The total number of components that the port can handle simultaneously. Includes loadout, loadoff, and general-use berths. If you do not specify a number, the capacity is unlimited. |
|
| Custom route | Create custom waypoints for a vessel leaving port. Use this to avoid land or other obstacles during transit. By default, the vessel will take the most direct route, i.e., a straight a line. | |
| Remarks | Optional comments related to the base. |
Cost
Choose a currency and click Change all currencies to set all costs on this page to the selected currency. Any costs for other assets or logistics will not be affected.
Note: Currency is not reflected in the cost output. It is recommended to set a single currency for all costs throughout your cases.
| Parameter | Required | Description |
|---|---|---|
| Annual cost of base staff | Costs related to staffing on the base calculated per year of the simulation. | |
| Annual cost of facilities | Costs related to renting or maintaining the facility calculated per year of the simulation. | |
| Annual other costs | Any additional costs calculated per year of the simulation. | |
| Loadout berth capacity | The number of berths available for logistics loading off components at the base. This is used to ensure loadout will be prioritized above loading off for these berths. | |
| Loadoff berth capacity | The number of berths available for logistics loading off components transported from another base. These berths will be prioritized for loading off above loading out. | |
| Total berth capacity | The total number of berths available in the port. Should be set to at least the sum of loadout and loadoff berth capacity, but it can be higher if there are berths that will be used first come first served. | |
| Custom route | Create routes with waypoints you define for logistics arriving and departing the base. Use this to avoid obstacles during transit or specific routes like roads or sailing routes. If no custom route is defined we use aerial routing (straight line). | |
| Remarks | Optional comments related to the base. |
Weather
The weather tab appears after you have added your base to the input library.
Click on a grid square on the map to download ERA5 weather data for that area or click Select weather from input library to use weather data that you or another user has added to your input library.
Sharing
Define what users have read, write, and admin access to the base template.
You can set bulk access using the Set all dropdown.
The Default access level for new users setting applies to all users subsequently added to your Shoreline account.
In the table, you can set access levels for individual users.
Add custom routes
Create custom routes using waypoints and assign the routes to logistic types to follow when departing from a base.
Use the route planner to avoid obstacles and protected areas and account for other environmental or logistical factors.
Route planner overview
The route planner map interface provides the following tools in descending order as seen in the screenshot above.
- Zoom in
- Zoom out
- Focus
- Delete all waypoints
- Delete the first way point
- Delete the last waypoint
- Reverse the route direction
- Change the route color
Click and drag on a waypoint on the map to relocate it.
Add a new route
You can add a new route to a base from your input library or from within a case. Navigate to the base and open the base details to begin.
- Click the Route planner tab.
- Click + Add new route.
- Hover over the new route and click the Edit (pencil) icon.
- Set the Route name and Color in the General section.
- Scroll down to the Waypoints section to describe the route.There are two ways to add waypoints:
- Add way points manually: Click + New way point and enter the latitude and longitude as required.
- Add waypoints from the map:
- Click Edit on map.
- Click on the map to place the first waypoint.
- Continue clicking to add further waypoints.
- When the route has been created, click on Stop editing.
- Add time delay and speed limit values to your waypoints.
- Expand the Advanced options section to set the route inputs.
- Click Confirm.
Route inputs
| Input | Required | Description |
|---|---|---|
| Route name | x | A custom name to reference the route. |
| Logistic types | The route is automatically applied to any logistics of the types you select here when operating from this base. No two routes from a base can share the same Logistic types and Logistic load status. |
|
| Destinations | The wind farm or bases at which the route terminates. Note: Only available at the case level. |
|
| Logistic load status | x | Whether the route applies to the vessel type when loaded, unloaded, or either. Load status affects the vessel draft. Use custom load status routes to, e.g., avoid underwater cables when sailing with a deeper (loaded) draft. |
| Is default route | x | When a route is marked as the default route, two things occur: 1. When you add this base to a case, all wind farms in the case are set as Destinations on this route. 2. When you add, update the location of, or remove a wind farm from a case, the route is automatically updated to account for the changes. If more than one route is marked as the default, the routes cannot have the same Logistic load status or share any Logistic types. |
| Color | x | Display the route on the map in the selected color. |
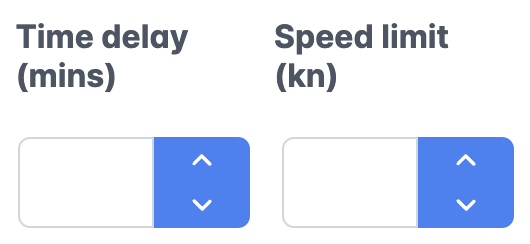
| Time delay (mins) | Time a vessel must spend at a waypoint for, e.g., customs checks. | |
| Speed limit (kn) | Account for local restrictions or environmental factors that limit vessel speed between certain waypoints. This parameter affects the speed from the previous waypoint to this waypoint. |
Add weather along the route
Select weather data at each waypoint of the defined route and assign the routes to logistic types to follow when departing from a base, or embarking on long-haul.
Use weather along the route to model cases with more accurate weather delays and downtime.
Weather along the route overview
To the existing route planner, two tabs are now available:
- Weather data
- Power exponent law
Allowing users to:
- Add/remove weather data to each waypoint
- Define the power law exponent
Add weather to custom route
- click the dropdown menu on the
Weather datatab
The dropdown will display all downloaded weather files from the input library, starting with the file closest to the selected waypoint.
Weather file relevance is determined from the waypoint it’s on to the next one, and takes into consideration the precise direction of travel if the user defines the waypoints and assigns the relevant vessel to it.
- Define
Power law exponentat each waypoint in your custom route.

Use Advanced Options
After setting up all waypoints, these advanced options are available for case modeling:
-
Click
Advanced Options. -
Fill in the following:
Logistic types(e.g., HLV, CoTV, SOV)Destinations(add destination points or IDs)Logistic Load Status(e.g., loaded, unloaded, or loaded and unloaded)Default Route(toggle if this should be the default route)
-
Click
Confirm and Add
Note: It is important to assign a logistics type to the defined route if you do not want the travel path to default to a straight line between waypoints.
Important: SOVs will navigate in a straight line from the last waypoint to their off-duty location. All other logistics will navigate in a straight line to and from the route destination
Add assets
You can categorize your assets under the following asset types:
- Wind turbines
- Substations
- Inter array cables
- Foundations
- Monopiles
- Transition pieces
- Piles
- Jackets
- Mooring lines
Add an asset to the input library
- Go to the landing page of the simulation app.
- Click on the Input Library tab.
- Click on the Assets tab.
- Click on the relevant asset type.
- Click + Add.
- The asset details screen will appear. Here you can edit the members or instance of the asset, add weather data, set parameters and add tasks.
- Click Add.
Import assets
Note: Importing assets requires the import permission in your team settings.
Save time and create greater consistency within your Shoreline Design account by importing assets in bulk to your input library using a CSV file.
- Open the landing page of the simulation app.
- Click on Input Library at the top of the page.
- Click on the Assets tab.
- Click Import assets.

- Select the appropriate Column delimiter and Decimal delimiter. These will depend on how your CSV file is formatted.
- Click Select file.
- Navigate to your CSV file and click Open.
- Click on the Data Mapping tab.
- Enter values in the File Column Name column wherever your CSV file’s naming conventions differ to Shoreline’s.
- Click Import tasks.
You will see an import summary detailing how many lines from your CSV were successfully imported and whether there were any errors during the import process.
Add logistics
Logistics comprise any vessel or infrastructure used in the construction and maintenance of a wind farm, including vessels, helicopters, and cranes.
- Go to Shoreline Design.
- Click on the Input Library tab.
- Click on the Logistics tab.
- Click on the relevant logistic tab.
- Click + Add.
- Complete the logistic inputs.
- Click Add.
Add weather
Weather is an essential component of the Shoreline Shoresim simulation engine. The weather data you use in your cases will have a large impact on your simulation outputs as it is used to calculate logistic downtime and power production. For this reason, it’s important to use weather data that is accurate and applicable to your case.
ERA5 weather data is available to add to your cases by default. However, if you want custom weather data, you can add weather files to your input library, making the weather data available in any Design cases you create.
You can upload weather files in CSV format containing the following data:
- Required:
- Wind speed (m/s)
- Wave height (m)
- Optional:
- Wind direction (°)
- Wave period (s)
- Wave direction (°)
- Swell (m)
- Zero up crossing period (s)
- Tide (m)
- Current (m/s)
- Visibility (km)
- Month (1–12)
- Lightning (0, 1)
- Environmental restriction (0, 1)
How to add weather data
- Open Shoreline Design.
- Click Input Library.
- Click Weather.
- Click Add.
- Select the relevant Column delimiter and Decimal delimiter.
- Click Select CSV file.
- Navigate to the relevant file.
- Click Open.
- Click Upload.
- Use the dropdowns above the table to match the columns in your CSV file to the relevant Shoreline data types.
- When you select a wind-speed column, enter the Ref. height in the box that appears below the dropdown.
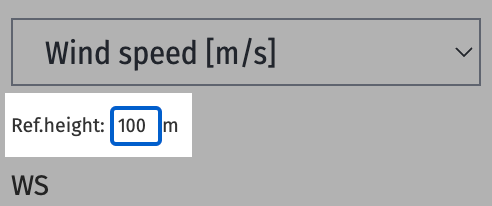
- When you select a wind-speed column, enter the Ref. height in the box that appears below the dropdown.
- Enter the required information in the input boxes below the table.
- Click Import.
How to edit, delete, and download weather data
From the input library screen, you can edit, download, and delete weather data you have previously uploaded. Use the icons on the relevant card for each action.
Manage permissions
You can share bases, assets, and logistics with other users at the read, write, and admin level. Configure the settings here to create an internal team responsible for managing your input library or allow users access to bases, assets, or logistics in their cases without being able to edit or delete them at the input-library level.
When adding or editing a base, asset, or logistic in your input library, click on the Sharing tab to view the permissions.
You can define permissions across all users with the Set all dropdown.
Use the Default access level for new users dropdown to select what permission is automatically applied to newly created user accounts.
In the table, you can set permission levels on individual users in the Access level column.
User permissions
Team admins have admin access to all inputs in the input library.
| Permission level | Description |
|---|---|
| No access | The input will not appear for the user throughout their account. |
| Read | User can view and use the input in their cases. They cannot edit the input at the input-library level. |
| Write | User can view and use the input in their cases. They can edit and delete the input at the input-library level. |
| Admin | Same as write access, but the user can also manage permissions on the input. |