
Overview
The Technician Contract module allows you to create, manage, and distribute employment contracts for your technicians and personnel. Using customizable contract templates with dynamic placeholders, you can generate professional contracts that automatically populate with employee information, work package details, and custom data fields.
Key Features
✅ Contract Templates – Create reusable templates with placeholders
✅ Bulk Contract Generation – Create contracts for multiple employees at once
✅ Dynamic Data Population – Automatically fill in employee details, dates, and custom fields
✅ Manual Input Fields – Add custom placeholders for contract-specific information
✅ Work Package Integration – Link contracts to specific work packages
✅ File Management – Upload, download, and manage contract documents
✅ Contract Status Tracking – Monitor active, expired, and upcoming contracts
Getting Started
Prerequisites
-
The TECHNICIAN_CONTRACT_CREATION feature flag must be enabled for your organization.
-
You need the MANAGE_PERSONNEL_CONTRACT permission to create and manage contracts.
-
You need the UPDATE_PERSONNEL_CONTRACT permission to modify contract templates.
- Permissions:
- Access or Read Personnel Contract to open contract templates and view employee contracts.
- Create Personnel Contract to create contract template groups and contract templates.
- Manage Personnel Contract to create contracts from employee profiles or bulk personnel selection.
- Update Personnel Contract to edit templates or replace an existing employee contract file.
- Download Personnel Contract to download contract files.
- Delete Personnel Contract to delete employee contracts, contract templates, or empty template groups.
Part 1: Setting Up Contract Templates
Step 1: Create a Contract Template Group
-
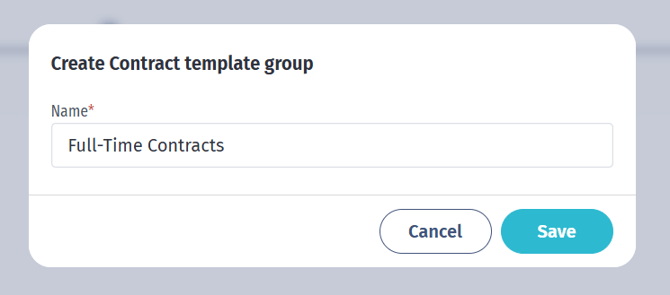
Before creating templates, organize them into groups such as “Full-Time Contracts,” “Contractor Agreements,” or “NDA Documents.
-
Go to Resources → Contract Templates.
-
Create at least one contract template group before adding templates.
-
Click Add Group, enter a group name, and save it.
Click Add New to create a contract template.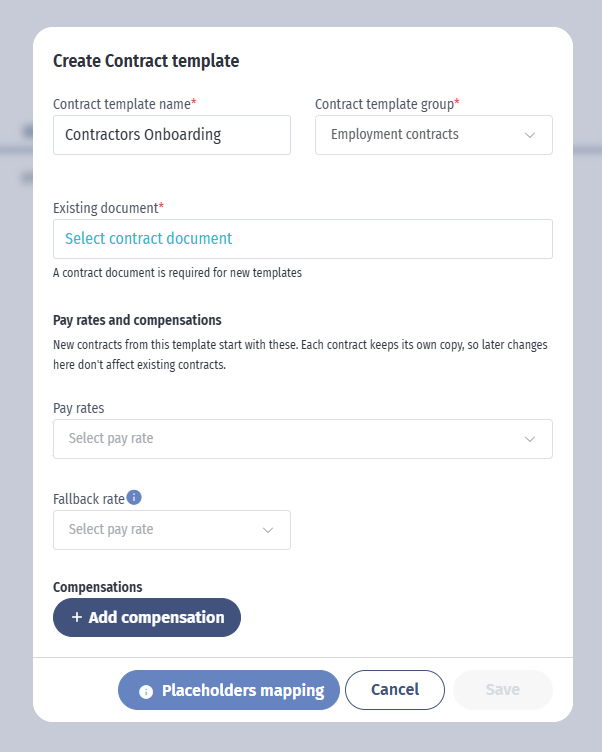
Step 2: Enter a template name, select a group, and upload a .doc or .docx file.
-
Template files are required when creating a new template. When editing an existing template, replacing the file is optional and requires confirmation.
- Template names must be unique within the selected group.
- Use the Placeholders button to view and copy available placeholders.
Step 3: Set default pay rates and compensations (Pay setup)
A contract template can store a default Pay setup: a set of pay rates, a fallback rate and compensations. New contracts created from the template start with these.
- Go to Resources > Contract templates and open the template.
- Open Pay setup.
- Add the pay rates, choose the fallback rate, and add the compensations you want new contracts to start with.
- Save.
Note: Each contract keeps its own copy of these pay rates and compensations. Changing them on the template later does not affect contracts that already exist.
Note: Pulling pay rates from a template needs the read company settings permission. Without it, the template's pay rates and compensations are not filled in.
Employment types
Maintain the employment types your contracts can use under Settings > Employment types.
- Go to Settings > Employment types.
- Click Add employment type, enter a name and save.
- To remove one, use the delete action.
To require an employment type on every contract, turn on Employment type is mandatory in the personnel settings.
Note: An employment type already used on personnel contracts cannot be deleted.
Note: Making the field mandatory does not change existing contracts; they need an employment type the next time they are edited.
Placeholder Types:
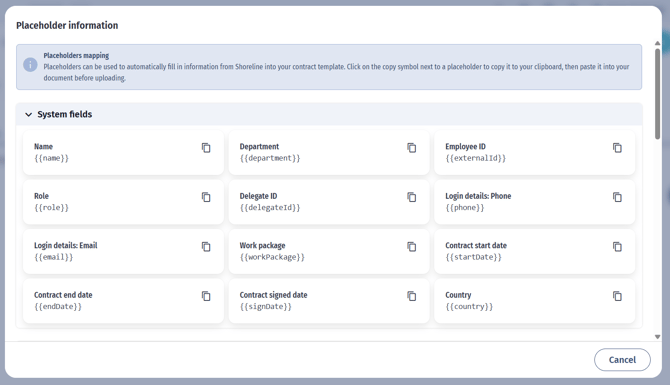
Use double curly brackets for all placeholders.
-
System fields use this format: kb-article-module-5, , , , , , , , , , , or .
-
Custom personnel fields use this format: .
-
Manual input fields use this format: true.
- Attachment custom fields are not available as contract placeholders.
- Date values are generated in DD-MM-YYYY format.
System Fields –
Example: kb-article-module-5 – Standard employee or system data
Custom Fields –
Example: – Employee custom field values
Manual Input Fields – true
Example: true – Contract-specific values entered manually
Available System Field Placeholders:
kb-article-module-5 – Employee full name
– Employee email address
– Employee phone number
– Employee department
– Employee role or position
– Employee ID
– Delegate ID
– Associated work package name
– Contract start date (DD-MM-YYYY)
– Contract end date (DD-MM-YYYY)
– Contract signature date (DD-MM-YYYY)
– Country associated with the contract
– Current date when the contract is generated
Example Contract Template:
EMPLOYMENT CONTRACT
This Employment Agreement is entered into on between [Company Name] and kb-article-module-5.
Employee Details:
Full Name: kb-article-module-5
Email:
Phone:
Department:
Position:
Employee ID:
Contract Terms:
Start Date:
End Date:
Work Package:
Country of Employment:
Compensation:
Annual Salary: true
Bonus Eligibility: true
Custom Terms:
Certification Level:
Security Clearance:
Signed on:
Step 3: Upload Your Contract Template
-
On the Contract Templates page, click Create Template.
-
Enter a template name, choose a group, and upload your .doc or .docx file.
-
Click View Placeholders to see which placeholders the system detected.
-
The system automatically extracts system fields, custom fields, and manual input fields.
-
Click Save.
Part 2: Creating Contracts for Employees
Method 1: Create Contract from Employee Profile
-
Go to Resources → Personnel.
-
Click an employee to open their profile.
-
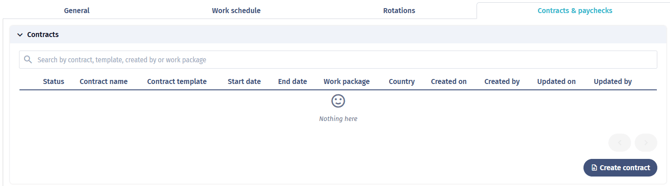
Open the Contracts & paychecks > Contracts tab.
-
Click Create Contract.
-
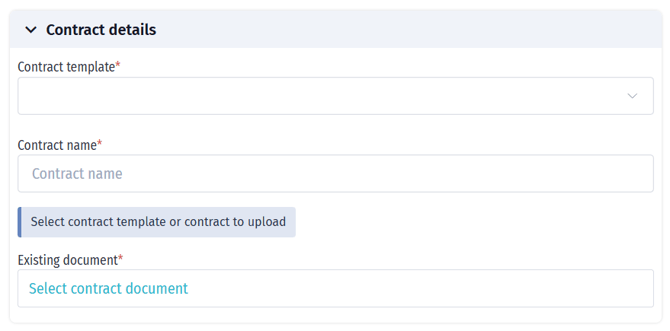
Complete the form.
Contract details:
-
Contract template: Select your template (optional if uploading a file).
-
Contract name: Enter a unique name.
-
Contract file: Upload a pre-filled file (optional, single employee only).
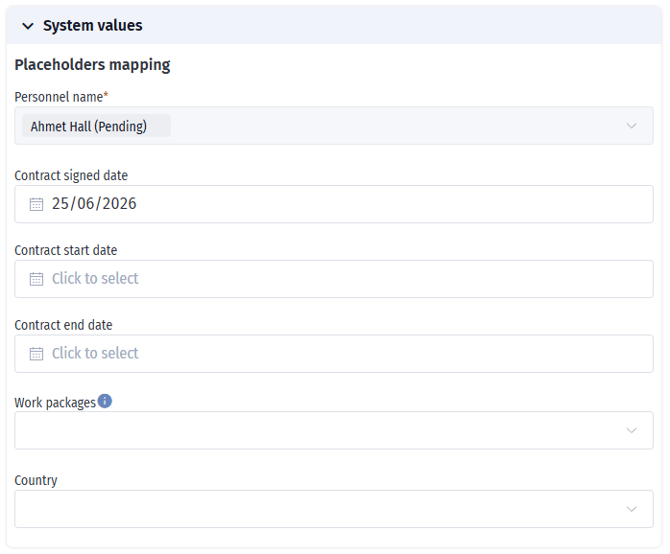
System values:
-
Personnel name (pre-filled).
-
Contract signed date.
-
Contract start date.
-
Contract end date.
-
Work packages (optional).
-
Country (optional).
Select an Employment type for the contract. Only one employment type can be chosen per contract.
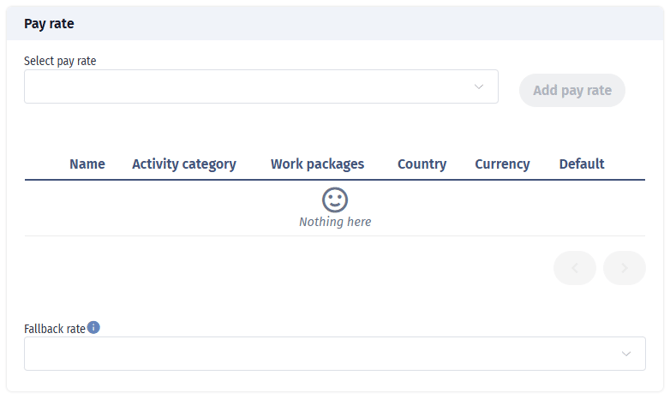
Pay rate:
- Select pay rate → Add pay rate
- Fallback rate
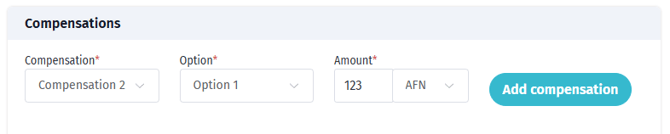
Compensations:
-
Compensation
-
Option
-
Amount → Add compensation
When you choose a template on the contract form and that template has a Pay setup, its pay rates, fallback rate and compensations fill in automatically. You can still edit them per person.
Note: The pay setup only fills in automatically while the contract's pay-rate section is still empty. If you have already added pay rates, the system asks before replacing them with the template's.
Tip: If a template does not fill anything in, check that it actually has pay rates configured under Pay setup - an empty template inserts nothing.
How compensations are counted
A compensation is recorded per person + option + day, with a quantity. It is not tied to an individual activity or project.
- If a person has several activities on the same day, they still get a single compensation line for that day, not one per activity.
- The system rejects a second identical compensation for the same person on the same day ("the same compensation is registered twice for a person and a day").
Note: Because a compensation is keyed only by person, option and day, you cannot currently record the same compensation (for example CSA or diet) twice on the same day for one person split across two projects. It is one per person per day.
Method 2: Bulk Contract Creation (Multiple Employees)
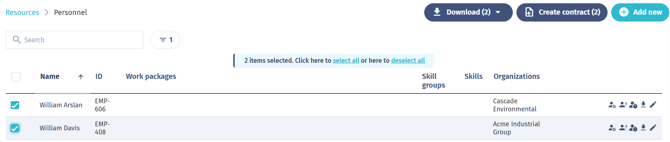
Go to Resources → Personnel, select one or more employees, and click Create Contract.
Important notes:
- Bulk contract creation is available for up to 100 selected employees.
- Manual input values entered during bulk creation are applied to all selected employees. For employee-specific manual values, create contracts individually.
- System placeholders like kb-article-module-5 are filled automatically per employee.
Part 3: Managing Contracts
Viewing Employee Contracts
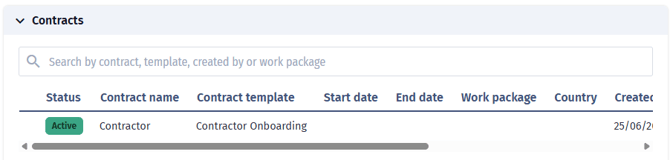
Each employee’s Contracts tab shows:
🟢 Active – Contract currently in effect
🔵 Upcoming – Contract starts in the future
🔴 Expired – Contract has ended
Contracts with no end date remain Active unless their start date is in the future.
Other details include contract name, template, dates, work package, and creator.
Contract Actions
-
📥 Download – Download PDF or Word file
-
📤 Upload/Replace – Upload a new version
-
🗑️ Delete – Remove the contract (requires permission)
-
👁️ View Details – Show custom and manual fields
Replace a contract
When the terms of a personnel contract change, you can replace it with a new contract from a chosen start date instead of editing the original. This keeps a record of both.
- Open the contract you want to replace.
- Click Replace contract.
- Fill in the new contract and set its start date.
- Save.
The original is marked Replaced and shows Replaced by [new contract]. The new contract shows Replaces [original contract].
Note: The replaced contract ends the day before the new contract starts, so the start date of a replacing contract is constrained: pick a start date after the replaced contract starts and no later than the day after it ends.
Edit a contract and mark it signed
A personnel contract can be edited while it is unsigned. Once it is signed, it is locked so the agreed terms cannot change.
- Open an unsigned contract, make your changes and save.
- When you upload the contract file, you are asked whether it is the signed contract.
- Click Yes, it's the signed contract to mark it signed.
- Click No, upload as unsigned to keep it editable.
A signed contract shows a Signed status and who marked it signed and when.
Note: A signed contract can no longer be edited or given a new file. It can only be replaced (see Replace a contract).
Note: If someone else changes a contract while you are editing it, you are asked to close it, open it again and redo your changes, so no edit is lost.
Searching and Filtering Contracts
You can filter by contract name, template, creator, or work package.
Part 4: Managing Contract Templates
Viewing and Organizing Templates
-
Go to Personnel → Contracts → Contract Templates.
-
Templates are grouped.
-
Expand a group to view its templates.
-
Each template shows its name, file name, and number of active contracts.
Editing a Contract Template
-
Find the template and click ✏️ Edit.
-
Update its name, group, or file.
-
Click Save.
Note: Editing does not affect contracts already created.
Deleting a Contract Template
You cannot delete a template in use. The delete option is grayed out when contracts reference it.
Reordering Templates
Click and drag the ≡ handle to change order.
Viewing Available Placeholders
Click ℹ️ Placeholders to view all available system and custom placeholders.
Part 5: Understanding Manual Input Fields
Manual input fields store contract-specific values that are not stored on the employee profile.
Creating Manual Input Placeholders
Use true in your Word document, for example true or true.
Using Manual Input Fields
When generating a contract, the system shows input fields for each manual input placeholder found in the selected template.
Example Use Cases:
true – Salary amount
true – Bonus percentage
true – Probation period in months
true – Notice period in weeks
true – Special conditions or notes
Part 6: Best Practices
Template Design
✅ Use descriptive template names
✅ Group similar templates
✅ Test with sample data
✅ Document manual input fields
✅ Add version numbers when updating
Contract Management
✅ Set accurate start and end dates
✅ Link contracts to work packages
✅ Review expiring contracts regularly
✅ Protect sensitive data with permissions
Data Entry
✅ Maintain consistent formats
✅ Verify employee data before generation
✅ Double-check input for bulk creation
✅ Keep custom fields up to date
Part 7: Troubleshooting
Common Issues
❌ “Unable to create contract template group”
-
Check your permissions and ensure the group name is unique.
❌ “Placeholders not populating correctly”
-
Verify syntax, case sensitivity, and field matches.
❌ “Cannot delete template”
-
The template is in use. Delete or reassign contracts first.
❌ “File upload failed”
-
Only .doc and .docx files are supported. Check for corruption or file size limits.
❌ “Contract not generating”
-
Check that all required fields and template data are available.
Part 8: Permissions Reference
Permission – What it allows:
readPersonnelContract – View contract list.
MANAGE_PERSONNEL_CONTRACT – Create employee contracts.
UPDATE_PERSONNEL_CONTRACT – Create or edit templates.
DELETE_PERSONNEL_CONTRACT – Delete contracts.
Feature flag required: TECHNICIAN_CONTRACT_CREATION.
Permissions: contracts, pay rates and paychecks
These are independent rights, so you can grant one without the others.
Contracts - Access, Read, Create, Update and Download personnel contracts (ACCESS / READ / CREATE / UPDATE / DOWNLOAD_PERSONNEL_CONTRACT).
Paychecks / payroll - Create, Read, Update and Download paychecks, plus Bulk paychecks for the bulk export (CREATE / READ / UPDATE / DOWNLOAD_PAYCHECK and BULK_PAYCHECKS). These are separate from contract rights; grant both if the same person handles contracts and payroll.
Pay-rate visibility - gated by read company settings (READ_COMPANY_SETTINGS). You can give someone contract access while keeping pay-rate numbers hidden; without this right, pay rates are not shown and are not pulled from a contract template.
Note: A permission/responsibility matrix is being finalised with the team; map these rights to the role rows once it lands.
Frequently Asked Questions
Q: Can I create a contract without a template?
A: Yes, for a single employee using the upload option.
Q: What happens if employee data changes after generation?
A: Existing contracts remain unchanged.
Q: Can I generate contracts as PDFs?
A: The system creates Word files; you can convert them to PDF afterward.
Q: How do I handle renewals?
A: Create a new contract with updated terms. The old one will be marked as expired.
Q: Can I use one template for multiple employee types?
A: Yes, as long as it’s flexible.
Q: What date format should I use?
A: Use DD-MM-YYYY.
Support and Additional Help
For technical or policy-related questions:
-
Contact your system administrator.
-
Consult your HR team for policy clarifications.
-
Refer to the main personnel management documentation