
Work Plans help you create work orders from reusable plan details. Use a Work Plan when you want to apply the same maintenance setup to multiple sites, assets, or subassemblies, or when work should repeat on a schedule.
A Work Plan can be used in two ways:
- One-time plan: creates work orders once when you apply the plan.
- Recurring plan: creates work orders automatically based on the recurrence schedule you configure.
Each Work Plan contains:
- Plan Setup: the sites and assets the plan can apply to.
- Recurrence: whether the plan runs once or repeats on a schedule.
- Plan Details: the work order templates used to create generated work orders.
Table of Contents
- Where to find Work Plans
- Work Plan statuses
- Create a Work Plan
- Configure recurrence
- Add Plan Details
- Apply, start, pause, resume, duplicate, or delete a Work Plan
- Monitor generated work orders
- Prerequisites and limitations
- Troubleshooting
- Best practices
Where to find Work Plans
- Go to Work Orders.
- Select Work Plans.
- The Work Plans list opens.
From the list, you can:
- Search for plans by plan name, Plan Detail name, site, or asset.
- View the plan status.
- Review recurrence type, start date, end date, generated work order count, and plan ID.
- Open, duplicate, pause, resume, or delete a plan.
- Expand a plan to review generated work orders.
Work Plans are available in the online desktop web app. They are not available offline and are hidden on mobile.
Work Plan statuses
| Status | Meaning |
|---|---|
| Inactive | The plan is saved but not running as recurring automation. One-time plans may remain inactive after they are applied because they do not continue running. |
| Active | The plan is running and can generate recurring work orders when the creation date is reached. |
| Paused | The plan is temporarily stopped. No new recurring work orders are created while paused. |
| Finished | The recurring plan has reached its configured last occurrence date. |
Create a Work Plan
- Go to Work Orders > Work Plans.
- Click Add new.
- Enter a clear Plan name.
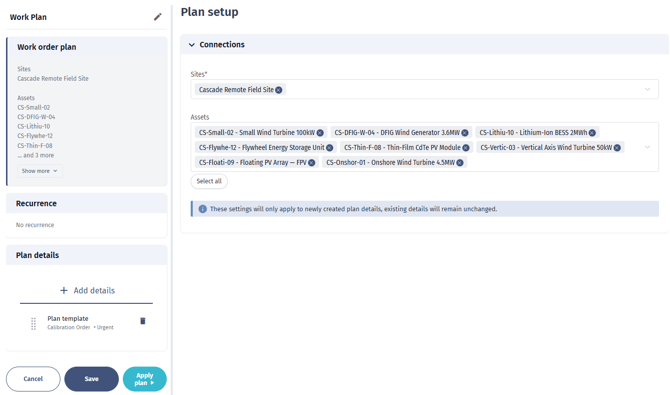
- In Plan setup, select at least one Site.
- Select one or more Assets, if the plan should be limited to specific assets.
- Use Select all if you want to include all available sites and assets.
- Continue to Recurrence or Plan Details.
A plan must have a name and at least one site before it can be saved. Recurrence and Plan Details are not available until at least one site is selected.
Configure recurrence
Use recurrence to decide whether the plan creates work orders once or repeatedly.
No recurrence
Choose No recurrence for a one-time plan.
When you click Apply Plan, the plan creates work orders once for the selected targets. The plan does not continue running afterward.
Use this option for:
- One-off campaigns
- Manual bulk creation of similar work orders
- Applying a template to selected sites, assets, or subassemblies without ongoing automation
With recurrence
Choose With recurrence when work orders should be created automatically on a schedule.
When recurrence is enabled, the plan uses recurrence settings to calculate generated work order dates. The date fields inside each Plan Detail are locked because the recurrence controls them.
Use this option for:
- Monthly, quarterly, or annual inspections
- Routine preventive maintenance
- Repeating operational checks
- Scheduled safety or compliance tasks
Recurrence settings
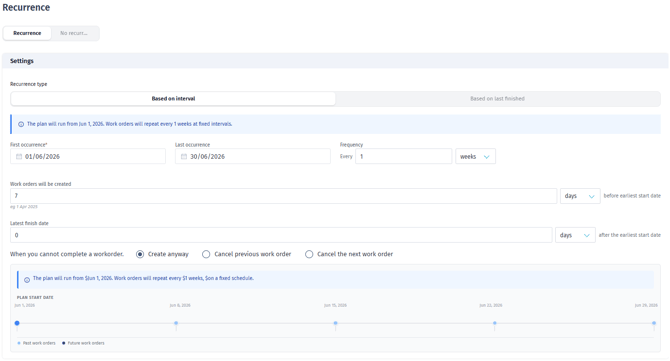
Recurrence type
Choose one of the following recurrence types:
| Recurrence type | Use when |
|---|---|
| Interval-based | Work should repeat on a fixed schedule, such as every 1 month or every 12 weeks. |
| Based on last finished | The next cycle should be based on when the previous work order is finished. |
Use Interval-based for strict calendar schedules.
Use Based on last finished when the next work order should shift based on actual execution.
First occurrence
Select the first date the work should be scheduled for.
For recurring plans, this field is required before the plan can be started.
Last occurrence
Optionally select the final recurrence date.
When the plan reaches the last occurrence date, it can move to Finished.
Frequency
Set how often the plan repeats.
Supported units are:
- Years
- Months
- Weeks
- Days
Examples:
- Every 1 month
- Every 3 months
- Every 2 weeks
- Every 365 days
Use a positive frequency. Avoid very short frequencies unless you are sure the generated workload is expected.
Creation timing
Set how far in advance the work order should be created before the earliest start date.
Example:
- First occurrence: 1 July
- Creation timing: 14 days before earliest start date
- Result: the work order becomes visible for planning 14 days before 1 July
Use this to give planners time for:
- Crew planning
- Vessel or transport planning
- Procurement
- Review and coordination
Latest finish
Set how long after the earliest start date the work order should remain within its planned execution window.
Example:
- Earliest start: 1 July
- Latest finish: 7 days after earliest start
- Result: the generated work order has a planning window from 1 July to 8 July
If previous work is not completed
This setting is available for interval-based recurrence.
| Option | What happens |
|---|---|
| Create anyway | The next work order is created even if the previous one is still open. |
| Cancel previous | The unfinished previous work order is canceled before creating the next one. |
| Cancel next | The new cycle is skipped if the previous work order is still open. |
Choose carefully. This setting affects backlog size and how overlapping work is handled.
Timeline preview
After you enter a first occurrence, frequency, and unit, a timeline preview is shown.
Use the preview to check:
- Whether the schedule starts on the expected date
- Whether the frequency is correct
- Whether the plan creates work orders early enough for planning
- Whether the long-term workload looks reasonable
Add Plan Details
Plan Details define the work orders that will be created by the Work Plan.
A Work Plan must have at least one valid Plan Detail before it can be applied or started.
- Open the Work Plan.
- Go to Plan Details.
- Click Add details.
- Complete the required fields.
- Add optional requirements, tasks, materials, checklists, custom fields, comments, and assignment details as needed.
- Save the plan.
You can add multiple Plan Details to one Work Plan. If multiple Plan Details apply to the same target, the order matters. Drag Plan Details to reorder them before saving.
Required Plan Detail fields
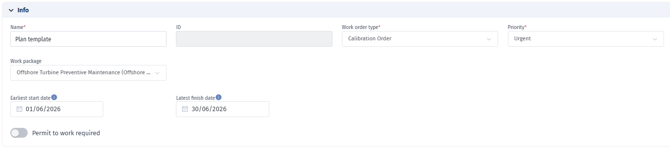
The following fields are required before a plan can be applied or started:
- Name
- Work order type
- Priority
A Work package may also be required depending on your company settings.
If you cannot select or edit the work package, contact your administrator to check your permissions.
Deleting a Plan Detail removes it from the Work Plan going forward. Work orders that were already created from that Plan Detail are kept for history and execution tracking. If you need to cancel or remove those work orders, review and update them separately from the Work Plan.
Plan Detail sections
General information
Use this section to define the core work order information:
- Name
- Work order ID
- Work order type
- Priority
- Work package
- Earliest start date
- Latest finish date
- Permit to work required, if enabled for your company
If recurrence is enabled, earliest start and latest finish are controlled by the recurrence settings and cannot be edited inside the Plan Detail.
If recurrence is not enabled, you can set the dates manually in the Plan Detail.
Estimation
Use this section to enter the estimated effort for the generated work order.
Depending on your company setup, this may be shown as estimated clock hours or estimated man-hours.
Requirements
Use this section to add the resources needed to complete the work:
- Allowed transport types
- Minimum number of personnel
- Required skills
- Required skill groups
- Required quantity for each skill or skill group
These requirements are copied to generated work orders and can help planners understand feasibility.
Tasks or activity categories
Depending on your company configuration, you may see either:
- Tasks, where you can define task-level activity categories, estimated time, and descriptions.
- Generic activity categories, where you select activity categories without task-level detail.
If tasks are enabled, task estimates can be used to support the work order estimate.
Bill of Materials
If enabled for your company, you can add planned inventory or materials to the Plan Detail.
These planned materials are copied to each generated work order.
Checklists
If enabled for your company, you can add checklist templates to the Plan Detail.
When the work order is generated, checklists are created from the selected templates.
Custom fields
Custom fields are based on the selected work order type.
Supported custom field types include:
- Text
- Number
- Select list
- Link
- Attachment
When you change the work order type, the available custom fields are refreshed. Review custom field values after changing the work order type.
Comments
Use comments to add extra information:
- Public comments are visible as operational work order information.
- Internal comments can be used for internal planning notes or constraints.
Assignment
Use Assignment to decide exactly where the Plan Detail applies.
You can assign by:
- Site
- Asset
- Subassembly
The system creates work orders at the most specific selected level:
| Assignment selected | Work orders are created for |
|---|---|
| Subassemblies | Each selected subassembly |
| Assets, with no subassemblies selected | Each selected asset |
| Sites, with no assets or subassemblies selected | Each selected site |
Use the search field to find subassemblies by position ID.
Save a Work Plan
- Open the Work Plan.
- Check that the plan has:
- A name
- At least one site
- Click Save.
Saving keeps the plan configuration. It does not automatically create recurring work orders unless the plan is active.
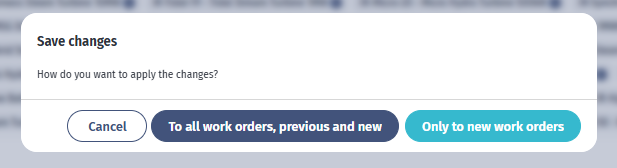
If the plan has already created work orders, you may be asked how to apply your saved changes:
| Option | What happens |
|---|---|
| Save and apply all (To all) | Changes are applied to existing open or unlocked work orders created from the plan, where possible. |
| Save new only (Only to new) | Existing generated work orders are not updated. Changes apply to future or newly generated work orders. |
Completed or locked work orders are not updated by later template changes.
Apply a one-time Work Plan
Use this workflow when recurrence is set to No recurrence.
- Open the Work Plan.
- Check that the plan has at least one valid Plan Detail.
- Click Apply Plan.
The plan creates work orders once for the assigned targets.
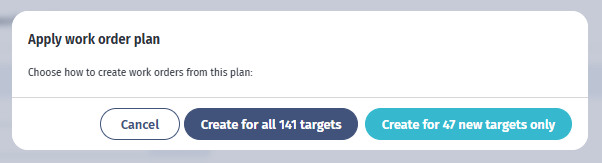
If the one-time plan has already created work orders, you may be asked how to apply it again:
| Option | What happens |
|---|---|
| Apply all (Create for all targets) | Creates work orders for all selected targets again. This can create duplicates. |
| Apply all anyway (Create duplicates for all targets) | Confirms that you want to create work orders again even when all selected targets are already covered. |
| Apply missing only (Create for new targets) | Creates work orders only for targets that do not already have work orders from this plan. |
Use Apply missing only (Create for new targets) when you have added new sites, assets, or subassemblies and want to avoid duplicates.
Start a recurring Work Plan
Use this workflow when recurrence is set to With recurrence.
- Open the Work Plan.
- Confirm the recurrence settings.
- Confirm that the plan has at least one valid Plan Detail.
- Click Start Plan.
The status changes to Active.
The system creates work orders when the configured creation date is reached. The creation date is calculated from the earliest start date minus the creation timing offset.
Example:
- Earliest start: 1 July
- Creation timing: 14 days before earliest start
- Work order creation date: 17 June
Pause a recurring Work Plan
Use pause when you want to temporarily stop new recurring work orders from being created.
- Open the active Work Plan.
- Click Pause Plan.
You can also pause an active plan from the Work Plans list.
When paused:
- The status changes to Paused.
- No new recurring work orders are created.
- Existing work orders remain available.

Resume a paused Work Plan
- Go to Work Orders > Work Plans.
- Find the paused plan.
- Click the resume/play action.
The status changes back to Active.
The plan continues using its recurrence configuration.
Duplicate a Work Plan
Use duplicate when you want to create a similar plan without starting from scratch.
- Go to Work Orders > Work Plans.
- Find the plan.
- Click the duplicate action.
- Review the copied plan.
- Rename it.
- Adjust sites, assets, recurrence, Plan Details, and assignments.
- Save, apply, or start the copied plan.
The copied plan does not keep the original plan status.
Delete a Work Plan
- Go to Work Orders > Work Plans.
- Find the plan.
- Click the delete action.
- Confirm the deletion.
A Work Plan cannot be deleted if it already has generated work orders. If you need to remove work created by a plan, review the generated work orders first.

Monitor generated work orders
Use the Work Plans list to review what a plan has created.
- Go to Work Orders > Work Plans.
- Search for the plan if needed.
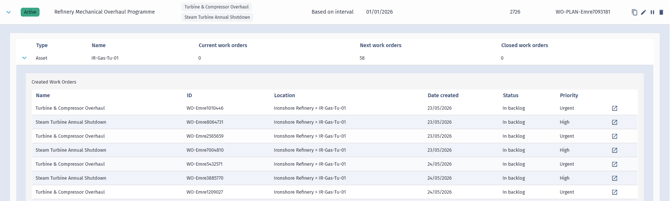
- Expand the plan row.
- Review the grouped site, asset, or subassembly rows.
- Expand a group to view work order details.
- Open a work order from the list if you need to review it.
The expanded view shows:
- Created work orders
- Associated work orders
- Work order name
- Work order ID
- Location
- Created date
- Status
- Priority
Work order counts are grouped as:
| Count | Meaning |
|---|---|
| Current work orders | Work orders that are ready, in progress, or in execution. |
| Next work orders | Planned, draft, scheduled, or other work orders that are not current or closed. |
| Closed work orders | Closed, completed, finished, or canceled work orders. |
Prerequisites and limitations
- You need access to Work Orders to see Work Plans.
- Viewing Work Plans requires work order read access.
- Creating Work Plans requires work order create access.
- Editing, starting, pausing, and resuming Work Plans require work order update access.
- Deleting Work Plans requires work order delete access.
- Work Plans are available online only.
- Work Plans are not available on mobile.
- A plan must have a name and at least one site before it can be saved.
- A plan must have at least one valid Plan Detail before it can be applied or started.
- Recurring plans require a first occurrence date.
- If recurrence is enabled, generated work order dates are controlled by the recurrence settings.
- Some Plan Detail sections depend on your company configuration, such as tasks, Bill of Materials, checklist templates, and Permit to Work.
- Work package may be required depending on your company settings.
- Existing generated work orders are not updated unless you choose an option that applies changes to existing work orders.
- Completed or locked work orders are not updated by later plan changes.
- Applying a one-time plan again can create duplicate work orders if you choose to apply it to all targets.
Troubleshooting
I cannot see Work Plans
Check that you are using the desktop web app while online. Work Plans are hidden on mobile and disabled offline.
If you still cannot see Work Plans, contact your administrator to confirm that you have access to Work Orders.
I cannot save the plan
Check that the plan has:
- A name
- At least one site selected in Plan Setup
Assets are optional, but at least one site is required.
Recurrence or Plan Details are disabled
Select at least one site in Plan Setup. These sections are disabled until the plan has a site.
I cannot apply or start the plan
Check that the plan has:
- A name
- At least one site
- At least one Plan Detail
- A name, work order type, and priority on every active Plan Detail
- A first occurrence date, if recurrence is enabled
- A work package, if your company requires it
The date fields are locked in Plan Details
Recurrence is enabled. When recurrence is enabled, the plan calculates generated work order dates from the recurrence settings.
To enter dates manually, set recurrence to No recurrence.
No work orders were created
Possible reasons include:
- The plan has not been applied or started.
- The plan is paused.
- The recurring creation date has not been reached yet.
- The plan has no valid Plan Detail.
- The Plan Detail has no assignment.
- A based-on-last-finished plan is waiting for the previous work order to be finished.
- The interval policy is set to skip the next cycle when previous work is incomplete.
Too many work orders were created
Check whether:
- The recurrence frequency is too short.
- The interval policy is set to Create anyway.
- A one-time plan was applied to all targets again.
- Multiple Plan Details apply to the same targets.
Duplicate work orders were created
This can happen if you apply an existing one-time plan to all targets again.
To avoid duplicates when adding new targets to an existing one-time plan, choose Apply missing only (Create for new targets).
Existing work orders did not update after I edited the plan
When saving a plan that already created work orders, choose the option that applies changes to existing work orders.
Completed or locked work orders are not updated.
My one-time plan still shows Inactive after I applied it
That can be expected. A one-time plan applies once and does not continue running as automation.
I cannot delete a plan
A plan cannot be deleted if it already has generated work orders.
Best practices
- Use clear plan names, such as Quarterly Transformer Inspection – Site A.
- Keep each plan focused on one maintenance objective.
- Use Interval-based recurrence for fixed schedules.
- Use Based on last finished for execution-driven maintenance.
- Set creation timing early enough for planning, vessels or transport, crew allocation, and procurement.
- Review the timeline preview before starting a recurring plan.
- Keep recurrence frequency realistic to avoid unnecessary backlog.
- Use Apply missing only (Create for new targets) when expanding an existing one-time plan to new targets.
- Review Plan Detail order before saving if the plan contains multiple details for the same target.
- Review custom fields after changing the work order type.
- Audit Plan Details regularly because each future cycle inherits the saved setup.